Easy Way to Get Full Plate in Kingdom Come Deliverence
There are 30 Treasure Maps in Kingdom Come Deliverance. This guide shows all Treasure Map Locations & Solutions so you know where to find all the secret loot.
You don't need to unlock the maps in order to find the treasures! You can go straight to the treasure location without acquiring the map. You can go to all of these locations as soon as completing Homecoming Main Quest. This is within the first 2-3 hours of the game.
Finding all treasures is the fastest way to get money in Kingdom Come Deliverance. It's also great for finding the best armor early in the game. Each treasure contains powerful armor parts and money. It's recommended that you keep the best armor pieces and sell the rest. Also keep one set of fine clothes that boost your charisma, it will come in handy in some dialogues. The treasure chests contain many books, too. These provide you with skill points and unlock new alchemy recipes.
Furthermore, the "Ancient Treasures DLC" is not needed to find the DLC treasures. This DLC simply gives you the maps for 5 treasure locations but even without downloading the DLC the treasures will be in the game. The DLC is NOT required to get the treasure loot.
Before You Start:
- You can head straight to the treasure location, no need to get the treasure map.
- Some treasures require lockpicking. You learn lockpicking by doing The Good Thief Side Quest.
- For treasure chests that require hard/very hard lockpicking, you can drink a padfoot potion, it increases your lockpicking by 5 levels for 10 minutes.
- In the early game it's best to skip the treasures that require hard/very hard lockpicking. Just do the ones that require no equipment or a spade, as pointed out in the treasure guide below.
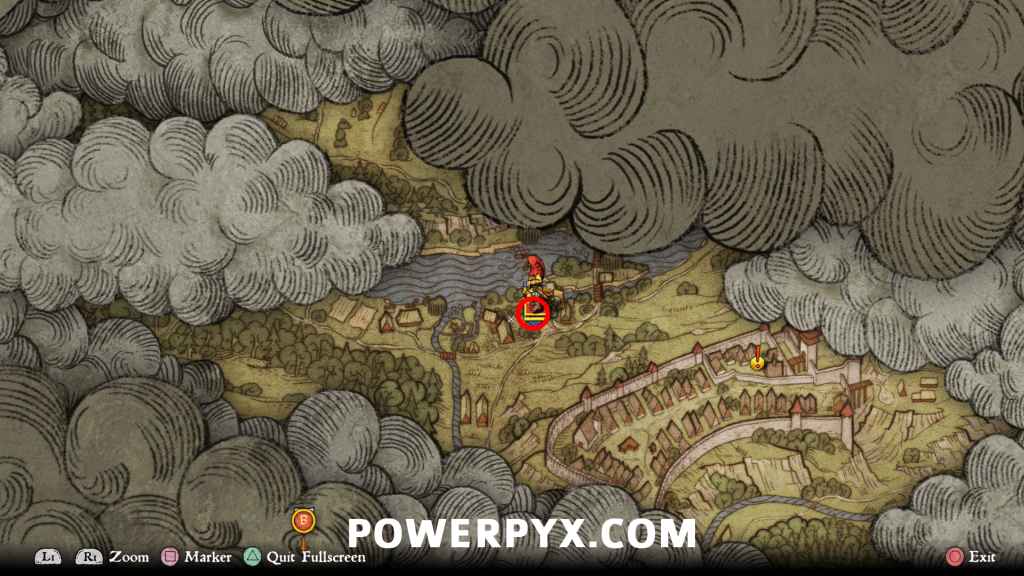
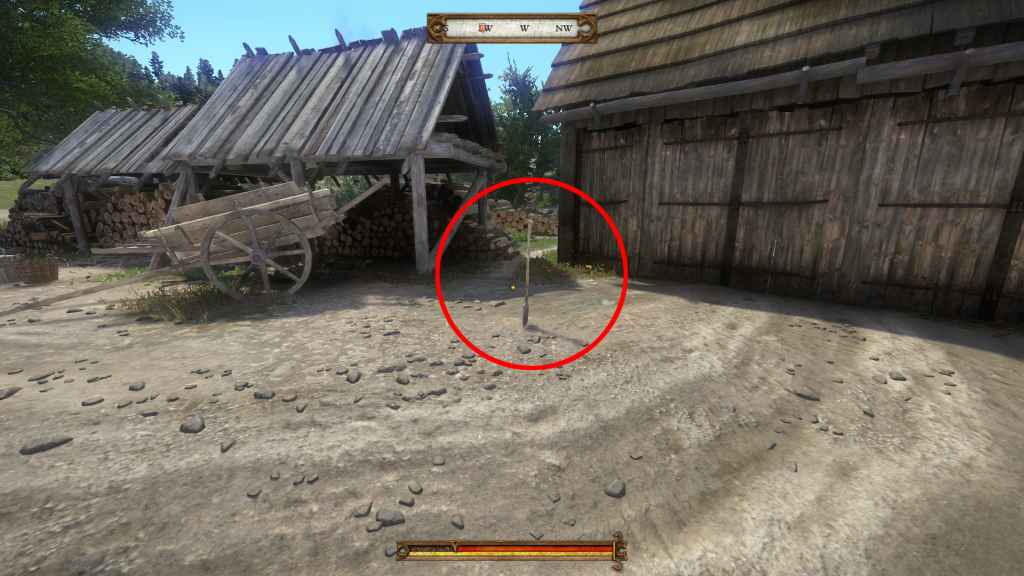
- Some treasures require a spade. The spade is found at the Rattay Mill, by a cart in front of the mill. See the screenshots below for Spade Location:
Video Guide
This video shows all 30 treasure locations:
– ANCIENT TREASURE MAPS –
To get Ancient Treasure Maps you must download the "Treasures of the Past" DLC (Pre-Order DLC). However, all the treasures can be found without the DLC and you don't need the maps to find them. So no worries if you don't have this pre-order DLC, you don't need it!
Ancient Treasure Treasure Map I (#1)
Ancient Treasure I Location (#1): Deep in the woods east of Rattay you can find a "Grave" location. It gets marked on the map when you are close enough. Dig it up with the Spade.
Where to Find Treasure Map: Download "Treasures of the Past" DLC. You can dig up this treasure even without the map.
Required Equipment: Spade
Rewards (Worth):
- German bascinet (790)
- Groschen (217.8)
- Lucky playing die (50)
- Recipe for poison (650)
- Silver Ring (184)
- Stinger (1.8k)
Ancient Treasure Treasure Map II (#2)
Ancient Treasure II Location (#2): In the south-west corner of the map in the deep woods you can find a "Cave" location (gets marked when you are closeby). There is a big rock above it. Inside the cave is a bag you can loot. You can get to these woods by taking the road north of the Rattay River, or by heading South from Sasau.
Where to Find Treasure Map:Download "Treasures of the Past" DLC. You can dig up this treasure even without the map.
Required Equipment: Nothing
Rewards (Worth):
- Ash Longbow (497.2)
- Decorated German bascinet (1k)
- Fashionable Slippers (463.5)
- Groschen (308.2)
- Heavenly Kingdom die (100)
- Marathon IV (1.3k)
- Plate jack dyed (925.2)
- Recipe for Artemisia potion (520)
Ancient Treasure Treasure Map III (#3)
Ancient Treasure III Location (#3): North of Uzhitz you can find the outlines of an empty field on the map, to the south-east corner of it is one single tree with a "grave" location below it that you can dig up!
Where to Find Treasure Map:Download "Treasures of the Past" DLC. You can dig up this treasure even without the map.
Required Equipment: Spade
Rewards (Worth):
- Grand bascinet (1.3)
- Groschen (485.4)
- Necklace (1k)
- Nobleman's boots (1.1k)
- Nurembergian cuirass (3.2k)
- Odd die (50)
- Recipe for Bivoi's Rage potion (845)
- Spike warhammer (305.9)
Ancient Treasure Treasure Map IV (#4)
Ancient Treasure IV Location (#4): In the woods in the south-west corner of the map, there is an "interesting site" location. It looks like ruins. You can climb up some broken stones to drop down into it. There's a chest that needs to be opened with a lockpick (easy difficulty). You learn lockpicking from The Good Thief Side Quest.
Where to Find Treasure Map:Download "Treasures of the Past" DLC. You can get this treasure even without the map.
Required Equipment: Lockpick (Easy)
Rewards (Worth):
- Fashionable Slippers (463.5)
- Groschen (200.9)
- Heavy warhammer (557.7)
- Lightweight dark brigandine (544.3)
- Recipe for Lullaby potion (650)
Ancient Treasure Treasure Map V (#5)
Ancient Treasure V Location (#5): In the woods north-west of Skalitz is a "deer hunting spot" that gets marked when you're closeby. There's an old broken hut with a chest on its side that requires the hard difficulty lockpicking skill.
Where to Find Treasure Map:Download "Treasures of the Past" DLC. You can get this treasure even without the map.
Required Equipment: Lockpick (Very Hard)
You can drink a Padfoot Potion to temporarily increase your lockpicking skill by 5 points for 10 minutes.
Rewards (Worth):
- Dark plate-armor jacket (928.7)
- Decorated riding boots (647)
- Groschen (291.6)
- Lucky die (50)
- Recipe for Embrocation (480)
- The Rule of St. Nicholas III (450)
- Yew longbow (553.4)
– NORMAL TREASURE MAPS –
Treasure Map I (#1)
Treasure I Location (#1): In the woods north-west of Sasau is a "cave" location. There are two houses. Enter the one marked on the screenshot below in red. Inside you can head left to find a hidden ladder leading into the cave below. There's a locked chest there, requires Hard difficulty lockpicking skill.
Where to Find Treasure Map: In Miller Simon's Mill, east of Sasau.
Required Equipment: Lockpick (Hard)
Rewards (Worth):
- Augsburg plate chausses (2.5k)
- Groschen (349.3)
- Noble's dark shoes (941.9)
- Odd die (50)
- Recipe for Antidote (600)
- Who Needs a Key? III (450)
- Yew Longbow (553.4)
Treasure Map II (#2)
Treasure II Location (#2):In the small wood by the river west of the Sasau Monastery, look for a white tree without leaves. Below it is a "Grave" location you can dig up with the spade.
Where to Find Treasure Map: Sasau Monastery.
Required Equipment: Spade
Rewards (Worth):
- Decorated riding boots (647)
- Die of misfortune (50)
- Groschen (276)
- Lazarus Potion (110)
- Milanese plate chausses (1.2k)
- Noble cuirass (2.5k)
- The Alchemist's Dream IV (1.3k)
Treasure Map III (#3)
Treasure III Location (#3): In the woods behind the river west of Sasau is an "interesting site" location. There's an old house with a locked crate behind it, requires very hard lockpicking skill.
Where to Find Treasure Map: Bought from Fresco Master in Sasau. He spawns in Sasau inn later in the game, but again you don't need the map for the treasure.
Required Equipment: Lockpick (Very Hard)
Rewards (Worth):
- Aachen dark brigandine (1.5k)
- Fashionable slippers (463.5)
- Groschen (401.2)
- Magdeburg plate chausses (1.8k)
- Noble's hunting sowrd (587.8)
- Odd die (50)
- Silver Ring (184)
Treasure Map IV (#4)
Treasure IV Location (#4): In the woods between Ledetchko and Neuhof there's an "interesting site" location. It looks like a mineshaft entrance. Inside is a locked chest, requires very hard lockpick.
Where to Find Treasure Map: Bought from Brother Nicodemus in Sasau Monastery (the Herbalist). He spawns later in the story, but you don't need the map to find the treasure.
Required Equipment: Lockpick (Very Hard)
Rewards (Worth):
- Arching bascinet (2.4k)
- Noble's composite chausses (1.3k)
- Nobleman's boots (1.1k)
- Recipe for Bowman's Brew (585)
- Ash Longbow (497.2)
- Groschen (317.5)
- Shrinking playing die (50)
Treasure Map V (#5)
Treasure V Location (#5): At the "interesting site" location show in the map below, there is a dried-up well. In it is a sack that contains the treasure loot.
Where to Find Treasure Map: Bought from Miller Woyzeck, who you meet during The Good Thief Side Quest.
Required Equipment: Nothing
Rewards (Worth):
- Dyed Milanese brigadine (2.7k)
- Fashionable slippers (463.5)
- Grasses and Herbs IV (1.3k)
- Groschen (271.6)
- Recipe for Marigold decoction (490)
- Unpopular die (50)
Treasure Map VI (#6)
Treasure VI Location (#6): At the "interesting site" marked on the map below, there's a wooden chest that contains the treasure. Requires hard lockpick to be opened.
Where to Find Treasure Map: While fast-traveling you will randomly encounter a "Mysterious Wayfarer". When this random event happens you can buy this map from him. He can spawn in many different places.
Required Equipment: Lockpick (Hard)
Rewards (Worth):
- Fearnot Sword (882.3)
- Groschen (436)
- Lucky playing die (50)
- Noble's dark shoes (941.9)
- Recipe for Lazarus potion (600)
- Silver Ring (184)
Treasure Map VII (#7)
Treasure VII Location (#7): At the location marked "Woodland Garden" in the woods north of Ledetchko.
Where to Find Treasure Map: In the library of Sasau Monastery. You go there during A Needle in a Haystack Quest or you can break into it.
Required Equipment: Lockpick (Easy)
Rewards (Worth):
- Groschen (431.3)
- Kuttenberg cuirass (1.9k)
- Noble's shoes (105.7)
- Recipe for Spirits (220)
- Sharp as a Knife IV (1.3k)
- St. George's sword (2.2k)
- Unpopular die (50)
Treasure Map VIII (#8)
Treasure VIII Location (#8): At the "interesting site" south of Ledetchko, there's a sack behind a tree that contains the treasure.
Where to Find Treasure Map:There's a mill just north-west out of Uzhitz. Upstairs in that mill, on a wooden beam (very well hidden) lies the treasure map VIII.
Required Equipment: Nothing
Rewards (Worth):
- Bascinet with klappvisor (919.8)
- Fashionable slippers (463.5)
- Groschen (246.8)
- Necklace (1k)
- Odd die (50)
- Recipe for Dollmaker potion (585)
- Spiked warhammer (305.9)
Treasure Map IX (#9)
Treasure IX Location (#9): In the south-east of Skalitz there's a bridge (outside city walls). It's at the edge of the city. There's a treasure chest on the side of the bridge. The chest is open, doesn't require lockpicks.
Where to Find Treasure Map:Picked up from a shed in the north of Skalitz, outside the Skalitz walls.
Required Equipment: Nothing
Rewards (Worth):
- Aachen dyed brigandine (1.6k)
- Bailiff's Mace (819)
- Groschen (288.1)
- Metal-plated battle axe (1.3k)
- Necklace (1k)
- Silver Ring (184)
Treasure Map X (#10)
Treasure X Location (#10):At the "grave" location in the south-west section of the map, marked below. To get there, take the road north of Rattay beyond the river. From Rattay Mill you can cross the river via the bridge to the north.
Where to Find Treasure Map: In a locked chest in the "Inn in the Glade", a named location and fast travel point to the north-west of Neuhof.
Required Equipment: Spade
Rewards (Worth):
- Bascinet with klappvisor (919.8)
- Groschen (301.6)
- Holy Trinity die (50)
- Noble's dark shoes (941.9)
- Recipe for Digestive potion (480)
- St. Michale's sword (1.5k)
- Tavern Life IV (1.3k)
Treasure Map XI (#11)
Treasure XI Location (#11): There's an "interesting site" in the woods south-west of Ledetchko, marked on the maps below. You can reach it by heading up the hill from the riverside. Walk along the river until you find a broken cart on the riverbank, then head uphill from there.
Where to Find Treasure Map: Bought from vendor "Votava" in Talmberg.
Required Equipment: Nothing
Rewards (Worth):
- Lzarus potion (110)
- Noble's shoes (105.7)
- Odd die (50)
- Open bascinet (425.2)
- Yew hunting bow (374.5)
Treasure Map XII (#12)
Treasure XII Location (#12): There's an "interesting site" in the woods south-east of Rattay. You will find an old shed there and inside is a crate that requires the hard lockpick ability to be opened.
Where to Find Treasure Map: Bought from Miller Peshek at Rattay Mill after completing The Good Thief Side Quest.
Required Equipment: Lockpick (Hard)
Rewards (Worth):
- Decorated riding boots (647)
- Falchion (405.5)
- Knight's spurs (554)
- Lucky playing die (50)
Treasure Map XIII (#13)
Treasure XIII Location (#13):At the "accident" in the woods east of Rattay. On the edge of the woods. There's a shed with a treasure chest inside, requires easy lockpick.
Where to Find Treasure Map: Bought from Herbalist vendor (villager) located in the woods west of Neuhof.
Required Equipment: Lockpick (Easy)
Rewards (Worth):
- Old die (50)
- Groschen (349.7)
- Recipe for Aesop potion (455)
- Nobleman's boots (1.1k)
- Agile as a Weasel IV (1.3k)
- Noble sword (1.6k)
- Noble cuirass (2.5k)
Treasure Map XIV (#14)
Treasure XIV Location (#14):At the "grave" location near Neuhof. Dig up the grave with a spade.
Where to Find Treasure Map: Bought from Wayfarer between Rattay and Neuhof. He's a rare spawn when fast-traveling between the two locations.
Required Equipment: Spade
Rewards (Worth):
- Aachen decorated chausses (530.2)
- Decorated hunting sword (605.5)
- Groschen (366.5)
- Necklace (1k)
- Noble's shoes (105.7)
- Recipe for Bane potion (1.2k)
- Unpopular die (50)
Treasure Map XV (#15)
Treasure XV Location (#15): At the "interesting site" between Neuhof and Ledetchko you will find a collapsed barn and a spade sticking out the sand. Dig up the grave next to the spade.
Where to Find Treasure Map: In Tobias Feyfar's room of the lower Rattay castle, on a shelf in his room.
Required Equipment: Spade
Rewards (Worth):
- Ci die (50)
- Groschen (314.7)
- Lazarus potion (110)
- Noble's dark shoes (941.9)
- Old family herloom (1.8k)
- Plate jack dyed (933.5)
- Silence is Golden and Other Myths IV (1.3k)
Treasure Map XVI (#16)
Treasure XVI Location (#16): At the "grave" location marked on the maps below. There is a white tree without leaves next to the grave. It's close to a river.
Where to Find Treasure Map: Bought from Herbalist in Samopesh.
Required Equipment: Spade
Rewards (Worth):
- Groschen (100)
- Lazarus potion (110)
- Lucky playing die (50)
- Noble's shoes (105.7)
- Quality arrow (6)
- Villager's yew bow (159.3)
Treasure Map XVII (#17)
Treasure XVII Location (#17): This "grave" location is behind a wooden house. To the south of Skalitz.
Where to Find Treasure Map: Bought from Huntsman vendor in Rattay (marked on map as "Huntsman".
Required Equipment: Spade
Rewards (Worth):
- Ash longbow (497.2)
- Decorated riding boots (647)
- Groschen (222.2)
- Magedburg cuirass (2.4k)
- Necklace (1k)
- Odd die (50)
- Who Needs a Key? IV (1.3k)
Treasure Map XVIII (#18)
Treasure XVIII Location (#18): At the "interesting site" east of Talmberg. Beware, there's a poacher walking around here. You can knock him out from behind with a sneak attack. Then pick the lock of the chest (easy difficulty).
Where to Find Treasure Map: Bought from Huntsman Vendor in Talmberg (marked on map when you discover him in the south of Talmberg).
Required Equipment: Lockpick (Easy)
Rewards (Worth):
- Dogwood hunting bow (268.9)
- Fashionable slippers (463.5)
- Groschen (198.7)
- Hunting cap (348.7)
- Lucky playing die (50)
- Recipe for Nighthawk potion (780)
- The Joy of Gutting IV (1.3k)
Treasure Map XIX (#19)
Treasure XIX Location (#19): On the river that divides Sasau is a little island and on that a "grave" location that you can dig up for the treasure.
Where to Find Treasure Map:Bought from Wayfarer that spawns randomly during fast travels between Rattay and Ledetchko.
Required Equipment: Spade
Rewards (Worth):
- Decorated Cuirass (2.1K)
- Even number die (50)
- Groschen (266)
- Fashionable slippers (463.5)
- Primer IV (1.3k)
- Robber baron's sword (1.5k)
- Decorated cuirass (2.1k)
Treasure Map XX (#20)
Treasure XX Location (#20): At an unnamed location north of Skalitz, below the two trees at the pond. Inside a locked box that requires easy difficulty lockpicking.
Where to Find Treasure Map:Bought from herbalist (Charlatan) in Sasau.
Required Equipment: Lockpick (Easy)
Rewards (Worth):
- Ash Longbow (497.2)
- Basic horse-riding skills IV (1.3k)
- Groschen (357.1)
- Necklace (1k)
- Noble's dark shoes (941.9)
- Odd die (50)
- Recipe for Aqua Vitalis (910)
Treasure Map XXI (#21)
Treasure XXI Location (#21): There is a long mine tunnel at the location shown in the screenshot below. Run into the tunnel and stick to the left side. After 25-30 meters you'll see some ladders on the left. Clim up the ladders. On top the ladders you will find a locked treasure chest, requires very hard lockpick skill.
Where to Find Treasure Map: Found in a camp (gets marked on map) to the south-west of Skalitz, in one of the barns there.
Required Equipment: Lockpick (Very Hard)
Rewards (Worth):
- Bright Milanese brigandine (2.8k)
- Groscen (368.6)
- Lue die (50)
- Noble's shoes (105.7)
- Recipe for Buck's Blood potion (720)
- Silver ring (184)
Treasure Map XXII (#22)
Treasure XXI Location (#22): At the "interesting site" south-west of Vranik. There you will find a gallow in the woods with a sack next to it that contains this secret loot.
Where to Find Treasure Map: Rattay, in the Scribe's office (behind locked door). Keep in mind you don't need any of the maps to find the treasures.
Required Equipment: Nothing
Rewards (Worth):
- Dark Milanese brigandine (2.7k)
- Fer die (50)
- German bascinet (876.8)
- Groschen (358)
- Magdeburg sword (2.5k)
- Noble's dark shoes (941.9)
- Recipe for Cockerel potion (840)
- Silver ring (184)
Treasure Map XXIII (#23)
Treasure XXIII Location (#23): At the "interesting site" in the woods north of Skalitz. There are skeletons inside a cave that you can loot for the treasure.
Where to Find Treasure Map:In the bauer family farm on top of a barrel. The farm is to the south-east of Uzhitz between two long fields just before the woods.
Required Equipment: Nothing
Rewards (Worth):
- Groschen (273.7)
- Necklace (1k)
- Nobleman's boots (1.1k)
- Quartered combat jacket (1.2k)
- Recipe for Preserver potion (560)
- Unpopular die (50)
Treasure Map XXIV (#24)
Treasure XXIV Location (#24): At the "grave" location north of Skalitz on the edge of the woods (before the woods).
Where to Find Treasure Map: You can buy this from the "Mysterious Wayfarer" who you will randomly encounter during fast travel. He doesn't always spawn.
Required Equipment: Spade
Rewards (Worth):
- Groschen (271.9)
- Longinus' sword (1.4k)
- Lucky playing die (50)
- Noble's shoes (105.7)
- Recipe for Padfoot potion (845)
- Shadow Play IV (1.3k)
- Silver ring (184)
Treasure Map XXV (#25)
Treasure XXV Location (#25): The last treasure is found at a "grave" location in the woods west of Skalitz.
Where to Find Treasure Map: Outside the walls of Rattay (to the east) is a tavern/lodging. In the basement of that tavern you can find the treasure map. It is locked in a room that requires easy difficulty lockpicks.
Required Equipment: Spade
Rewards (Worth):
- Biased die (50)
- Dyed Milanese brigandine (2.8k)
- Groschen (206.4)
- Hercules and His Diet IV (1.3k)
- Italian bascinet (1.6k)
- Noble's dark shoes (941.9)
- Razor (1.2k)
- Recipe for Hair o' the Dog potion (325)
That's all of the Kingdom Come Treasure! Now you have more than enough armor, money and weapons for the rest of the game. Enjoy!
Source: https://www.powerpyx.com/kingdom-come-deliverance-all-treasure-map-locations-solutions/
0 Response to "Easy Way to Get Full Plate in Kingdom Come Deliverence"
Postar um comentário